Wednesday, August 17, 2011

Intro to Egypt

So over the summer Eli and I have started reading The Magic Tree House book series aloud {me reading}.  We LOVE our adventure books!  You see, the tree house takes the two children to wherever they point to in a book.  It takes them to all different time periods and countries!  We typically read an entire book in one sitting because they're that good.  And then afterward we spend some time learning more about the place we read about! I actually started Eli a notebook just for these tree house books. After we finish a book I have him draw a picture about it.  Book #1 I had him draw a picture of a tree house. Book #2 I had him draw a volcano and the town of Pompeii.  Book #3 I had him draw a pyramid.  And then we continue with more learning activities.  Here's what we did after reading Mummies in the Morning, a book about Egypt, pyramids, and mummies!

Activites (you could go MUCH more depth but I just wanted to do a little overview):

1. Find Egypt on a world map. I would LOVE to have a huge poster of a world map for the play room, perhaps one with some images that depict the different regions but have yet to find one. Haven't really searched much though either.


3. Build your own pyramid -- paper craft found HERE. You're supposed to coat it with sand, but after I selected some "clean" sand from our sandbox it still smelled like cat poop so I threw it out and we just left it as the paper pyramid.

4. Write your name in hieroglyphics using the symbol key. In the story Jack and Annie decoded hieroglyphics to help the ghost-Queen find her way to the Afterlife.
 These are all our names HANNAH, SARAH, ELIJAH (Eli wanted to put his full name), and DAD. Carter was napping so he wasn't part of the activity. Eli did his own but I helped with the others.

 5. Play a mummy computer game. This "treasure hunt" helps you learn more about Egyptian traditions and some of the things they include in the mummy's tomb.

6. Using toilet paper wrap each other like a mummy. I chose Hannah to wrap up because 1) I would take a lot of toilet paper to be wrapped. and 2) Eli was more likely to be the better wrapper. Although I did most of this. (note: I used curtain tie backs to tie Hannah's feet and arms together so should wouldn't accidentally break through the paper right away.)


7. Watch a History Channel Netflix video about pyramids and what's inside! Fun family activity!

8. Discussion: What IS the Afterlife and how do WE get there?

Tuesday, July 5, 2011

Food Lapbook

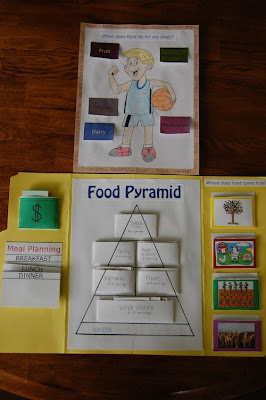
I pieced this lapbook together mostly from my own ideas, but you can find lots more grocery lapbook ideas here.  This is my favorite lapbook we've done so far, and is the most do-again and game-like. The kids love it and I'm confident they are learning so much! 

Goals: 
  • To gain understanding that food does REAL things for our body, we don't just eat food because it tastes good.
  • To build money skills in how to read $ amounts and figure numerical order.
  • To practice real-life skills such as menu planning and "looking for the cheapest price"
full view
 Food Pyramid (I realize that nutritionists don't 100% follow this same pyramid anymore, but it's the shape I wanted, and it does show the basic idea, including 8 cups of water a day, and mostly we're just focusing on the food groups anyway) These are the pockets for food cards which will be used in nearly all the activities.

#1 Sort food cards according to food group.
 # 2 Sort food cards according to color (mostly just the fruit and vegetable cards)
#3 Sort food cards according to where they come from (trees, animals, gardens, fields) I don't want my kids growing up just thinking food comes from the grocery store!
#4 Use food cards to lay out a daily menu plan. (use the serving suggestions on pyramid to help make sure diet is balanced)
#5 Money cards -- set out three cards and have child pick which $ amount is the smallest (we practice this in the grocery store too when I'm buying something)
#6 Money cards -- set out 3 or 4 cards and have child arrange them in order from smallest to biggest
#7 Money cards -- set out 4 (or more) cards and read a dollar amount and have child find correct card
#8 Money cards -- play same game as #7 and have child play game at YOU so HE is the one reading the $ amounts.
# 9 Money cards (including orange coupon cards) - select the whole-number $ cards and practice adding and subtraction, pretending the orange cards are your coupons at the end
#10 Just a general picture showing what different food groups do for our body. Use the clues to figure out what part of the body certain food groups help. Then glue the description onto the right food flap.
#11 An ABC list of foods, creating the border (for a complete food alphabet click here)

On the front of the flap-down 


#12 Vitamin chart (the info is all the same as this chart, minus the quantity column) I just reformated it so it could be a flip chart. Again the actual details of each vitamin aren't all that important. It's just neat to see that food works in an REAL way for our body!
#13 Kids' grocery list. Get out your store ads and let the kids practice cutting and gluing as they create their own "grocery list". I allowed them 2 treats but everything else had to be healthy choices.
 #14 And finally, to complete our lapbook, we included the Biblical tie-in for how our bodies are temples of the Holy Spirit so we are to take care of them. I had the kids color to make it look like themselves. This is glued on to the back cover of the folder.

It took us several days to complete all the activities, and now we can play again and again!


 DOWNLOAD LAPBOOK COMPONENTS:  

I think this includes everything to make your lapbook, though it will probably take a couple minutes to download. 

Instructions: 
*I do not have a file for the food pyramid because I just drew it myself and now I can't scan it or anything because of the pockets on the lapbook. 
* And I also don't have files for the pockets themselves. They are a large fat T-shape that you fold together to make your pocket though.  Use the food/money cards to gauge how big the pockets need to be.
* Except for the pocket fronts, the vitamin chart, and the "what does food do for my body" flaps, everything else is printed on cardstock. The pockets are also folded out of cardstock.


Enjoy and let me know if you use this!

Thursday, June 2, 2011

I stink at drawing!

Working on a lapbook here I was trying to draw a boy.  I couldn't find a clipart for what I wanted but I did find a good face to use, so I thought I could trace the face and draw the body myself.  Wrong.  See...
It wasn't even done yet and I could tell the torso and legs were all out of proportion.  SOMETHING didn't look right anyway and no matter how much I erased and tried again it just wasn't working.  So I browsed more clipart images on Google, and look how it came together!

the head, just changed the hat to hair and didn't include the baseball strips on the cheeks
flipped the paper and then traced the arm but drew the hand so it was more like a fist

the arm over basketball and jersey inspiration, though I did a lot of tweaking on the arm and hand
and last, the shoes.  Because I couldn't even draw shoes free hand without looking at something!


 All that turned into...

He's still not perfect, but sooo much better than what I was trying to draw on my own, and it finished out being the pose I was trying for in the first place!

Stay tuned to find out what project we used this boy for!!

Tuesday, April 19, 2011

Wordless Lapbook

The kids and I made a Wordless Lapbook, using most of our ideas from Just Call Me Jamin but we changed it up a little bit, added a few things, and gave it our own twist! It's a pretty simple one...

Here's the inside view. 
I arranged the mini color books so they'd form the shape of a cross (obviously you can see that there) Our booklets are made like Only a Boy blog (minus the drawn pictures) but the text is the same as Jamin's.  And we added the little poem from Only a Boy but we placed it in the middle of the cross.  Download the printables for the color booklets HERE.

Then we added the ABC's of salvation (download HERE), formatting it more like Jamin's.  If you flip up the text part, you can read the Bible verse that goes with it.  (the only thing I don't like is that this ABC book is on the fold of the lapbook, and that's a little bit awkward when folding)

We included the lyrics to our Gospel Fuzzies song (top left) and the GROW mini book (bottom right). Both printables can be found HERE.


The cross picture in the top right is just a coloring page found HERE I printed smaller and had Eli color.

The back of our lapbook folder is a color by number, glued onto construction paper just to add more color.

And honestly, we don't have anything on the front cover of our folder, but you can put whatever you want.  This was a pretty simple lapbook, didn't take much time to prepare it. (some lapbooks can really take forever and ton of printing and cutting!!) 

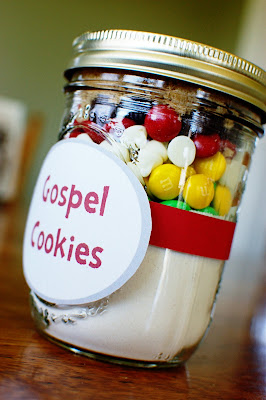
Then as a bonus activity, the kids and I made these Gospel Cookies (in a jar), adapted from these super cute Girlfriend Cookies. Instead of part M&Ms and and part chocolate chip, we used all M&Ms using the colors of wordless gospel, using some white chips for the white layer. So you fill the bottom half of the jar according to the recipe instructions.  Then add your layers: green, yellow, white chips, red, and brown, topping it with your 1/4 cup brown sugar.  I didn't have any coordinating fabric for the top of the jar, so it's just plain (oh well).  Then you add a fun label for your jar, include a rolled-up paper with the meanings of the colors, and give it away to someone!  The idea is that we'd leave the jar in the middle of our dinner table and every time we pray for our meal we pray for who we might share these gospel cookies with.  Then before Easter we give them away to our chosen person!

kids are color sorting the M&Ms while I prepare the flour stuff for the jar.


Easter Lesson

Intro
I printed these Easter sequence cards and glued them onto pieces of cardstock (just to make a little neater than white cardstock itself).  Have kids try to put sequence cards in order.

Bible Story
Then watch this Easter video (or read it all in a Children's Bible, but I chose the video just to add variety since we don't normally do videos and so our kind teacher wouldn't have to be reading foreeever). And most of the pictures used are actually from our Storybook Bible.


Now go back to cards and re-order them if necessary. (note: Palm Sunday isn't included in video) Or if you're reading from a Bible you can correct the cards as you read.

here is Eli doing the sequence cards again at home and telling ME the story

Lesson
"We can use colors to help us remember the gospel story."

BLACK reminds me of my sin. We are all sinners.  We can't be good all of the time no matter how hard we try.
RED reminds me of Jesus' blood when He died on the cross.  He paid the price for MY sin.
WHITE reminds me that Jesus forgives me and makes my heart clean as snow.
YELLOW reminds me of Heaven where streets are made of GOLD. When we have clean hearts we can live forever in Heaven.
GREEN reminds me of things that grow. Plants, trees, grass... These are things that grow.  i can grow too by learning more about Jesus by praying to him and reading the Bible.

Song
Here is a fun little song I like to sing that helps me remember all these colors... (the kids also sing this at AWANA) Click HERE for a video of how the song goes.

Gospel Fuzzies Song


We're the gospel fuzzies. We're the gospel fuzzies.
We're the gospel fuzzies with a song to sing.


Gold stands for Heaven. Gold stands for Heaven.
Gold stands for Heaven where I want to go.


But dark means I'm a sinner. Dark means I'm a sinner.
Dark means I'm a sinner & I can't get in. (by myself)


Red means Jesus died. Red means Jesus died.
Red means Jesus died and He rose again.


Clean means I'm forgiven. Clean means I'm forgiven.
Clean means I'm forgiven when I follow him.


Green means I am growing. Green means I am growing.
Green means I am growing every day in him.


We're the gospel fuzzies. We're the gospel fuzzies.
We're the gospel fuzzies with a song to sing.

Craft
I would've loved to make the Gospel Fuzzie glove for each of the children, but it was too much time and work for the size of our group.  So instead I made the half-paper worksheet with the song lyrics where the kids could glue on the coordinating fuzzies. (you can't tell from the picture but underneath show the color fuzzie on the paper for them to match with)


My kids and I also made a Wordless Lapbook here at home, centered around a lot of this same theme, so you can view that HERE.